This section will generate the embedded code that will be inserted into the webpage of your website. You can get the code in Generator Code Panel according to the instructions below:
1. Choose Design
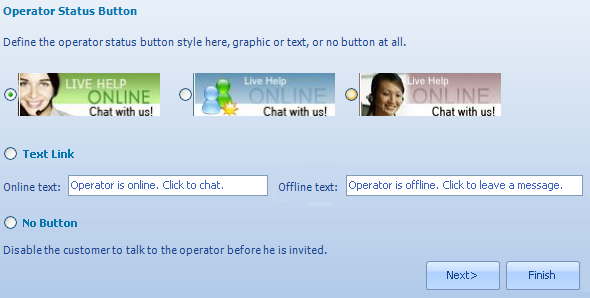
You can define the sign which indicates whether operator is online or not, it may be a status button or a text link, if you choose No Button, the system will disable the customers to ask for help before he is invited. You may design the image by your own and use it with 'online_display' param discribed below or let us do it for you.
2. This step mainly aims to define the invitation interface and the department that can use the function.
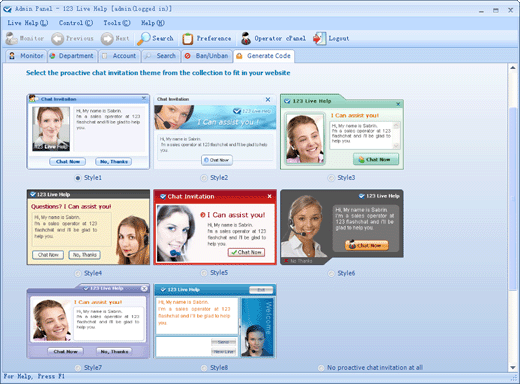
You can select the proactive chat invitation theme from the collection to fit your website.
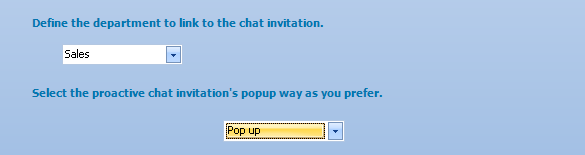
Define the department to link to the chat invitation, only the department that is chosen can use chat invitation. Select the proactive chat invitation popup way as your prefer. When it is finished, press Next to continue.
3 Advanced Options
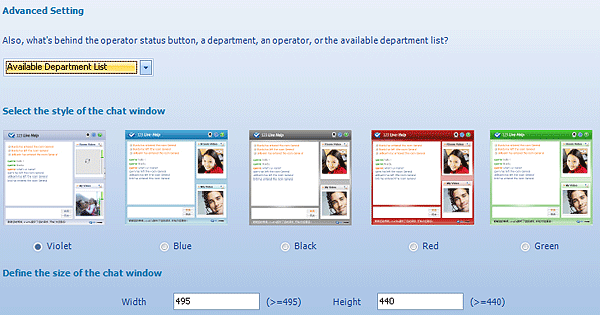
This panel mainly aims to define the department or operator that will see the invitation when a customer clicks on the help icon defined in the first step, chat window's style and size. When you choose A Particular Department or A Particular Operator, the corresponding department list would appear at the right side of drop-down list.

When you choose A Particular Operator, the corresponding operator list will appear at the right side of drop-down list.

When all of the settings are finished, click Next to continue, if you feel the need to change the setting in the last step, click Previous to modify.
4 Get HTML code
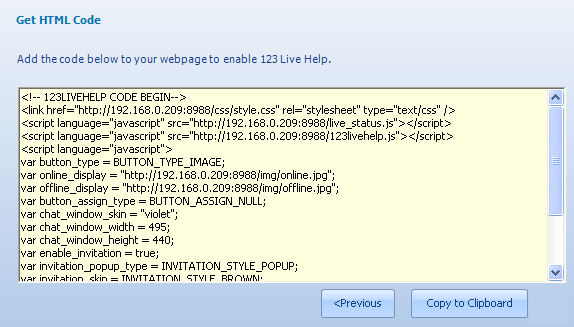
As you may know, the live chat code can be generated in the 123LiveHelp admin panel easily. Here are some more advanced tips to tailor-make the live chat.
1) init_host
You need to set 123livehelp server host name or IP, if it’s not the the default one (the domain or IP of the current URL of the chat client). eg. Your current web page URL is http://yourhost.com/client.html, so the default host name is yourhost.com. In order to connect to an external server otherhost.com, you can add the following code to your generated code.
var init_host = 'otherhost.com';
Click the generated 123livehelp button, the URL will be something like:
http://yourhost.com/client.html?init_host=otherhost.com;
2) init_port
Set 123livehelp server port, and it’s often set together with “init_host†to connect to certain server port and host.
Add the following code to the generated code:
var init_port = 8969;
3) button_type
Define 123livehelp online/offline button type. There are three types in the current version, as follows:
BUTTON_TYPE_IMAGE Image
BUTTON_TYPE_TEXT Text Link
BUTTON_TYPE_NULL No button
Refer to the following code:
var button_type = BUTTONvar button_type = BUTTON_TYPE_IMAGE;
4) online_display and offline_display
Set to display image or text of the generated online/offline button in 123livehelp. (When the button type is BUTTON_TYPE_IMAGE, it shows image, or it shows text with the button type setting as BUTTON_TYPE_TEXT.)
online_display : It defines what to display when operator is online..
offline_display: What to display when operator is offline
Refer to the following code:
A. Image display
var button_type = BUTTON_TYPE_IMAGE;
var online_display = "http://yourhost.com/img/online.jpg";
var offline_display = "http://yourhost.com/img/offline.jpg";
B. Image display
var button_type=BUTTON_TYPE_TEXT;
var online_display = "Operator is online. Click to chat.";
var offline_display = &qvar offline_display = "Operator is offline. Click to leave a message.";
5) chat_window_skin
Define the popup chat window skin. There are five default skins, black, blue, green, red and violet.
Refer to the following code:
You can refer to the following code:
chat_window_skin = "violet";
6) chat_window_width and chat_window_height
The two parameters are used to define the chat window size. The current minimum width is 495 pixels, and height 440 pixels. Any size smaller than the minimum will be adjusted to the minimum automatically.
Refer to the following code:
var chat_window_width = 495;
var chat_window_height = 440;
7) init_group
Set 123livehelp group name. Only available to the host users and pro license users. Every host user has a unique group name, which is usually applied by himself/herself. While the Pro license user can run several independent groups, but it’s not available yet. As to the general license users, the property of init_group is “defaultâ€.
Refer to the following code:
init_group ="default";
8) enable_invitation
It controls the proactive invitation. If set to true, invitation will be allowed. Or if set to false, then neither invitation nor website monitor will be possible. So generally it is not recommended to set to false.
Refer to the following code:
var enable_invitation = true; // Enable invitation
var enable_invitation = false;// Disable invitation
9) invitation_popup_type
Define the type of the invitation dialogue sent by operators. There are two types: INVITATION_STYLE_SLIDEDOWN: Invitation box slides down from the top of the screen to the middle. INVITATION_STYLE_POPUP: Invitation box pop-ups in the middle of the screen. Note: This parameter is not valid unless “enable_invitation†is set to true.
Refer to the following code:
var invitation_popup_type = INVITATION_STYLE_POPUP;
10) invitation_skin
It controls the skin of the invitation box. Currently, there are eight skins. You can preview all of them at the second step in admin panel -> generate code -> Invitation. It is valid only when enable_invitation set to true.
Refer to the following code:
var invitation_skin = INVITATION_STYLE_BROWN;
11) invitation_dept_id
It controls which department can send invitation to visitors by defining department ID in the admin panel -> Department.
eg. To enable Sales department to send invitation, firstly get its ID is 1 in the admin panel, then add the following code to your the generated code:
var invitation_dept_id = 1;
12) button_assign_type
It defines who can pick up a customer request, a department or an operator. Therefore you can place a unique button on some particular pages.
It has three values:
BUTTON_ASSIGN_NULL : All departments and staff can pick up the customers from this button.
BUTTON_ASSIGN_STAFF: Only specific staff can pick up the customer. (And it should be used together with pre_staff_id)
BUTTON_ASSIGN_DEPT: Only specific department can pick up the customer. (And it should be used together with pre_dept_id)
Refer to the following code:
All departments and staff can pick up the customer
var button_assign_type = BUTTON_ASSIGN_NULL;
Enable the department with ID “2†only to pick up the customer
var button_assign_type = BUTTON_ASSIGN_DEPT;
var pre_dept_id="2";
Enable the operator named “operatora†only to pick up the customer
var button_assign_type = BUTTON_ASSIGN_STAFF;
var pre_staff_id = "operatora";
13) pre_dept_id
As indicated before, this parameter is supposed to be used together with: button_assign_type. Please refer to: button_assign_type. pre_dept_id is invalid unless button_assign_type is set to be BUTTON_ASSIGN_DEPT. The value for pre_dept_id is department ID.
Refer to the following code, with which only department 2 can pick up customer requests.
var button_assign_type = BUTTON_ASSIGN_DEPT;
var pre_dept_id="2";
14) pre_staff_id
As indicated before, this parameter is supposed to be used together with: button_assign_type. Please refer to: button_assign_type. Pre_staff_id is invalid unless button_assign_type is set to be BUTTON_ASSIGN_STAFF. The value should be operator name.
Refer to the following code, with which only staff with name “operatora†can pick up the customer requests.
var button_assign_type = BUTTON_ASSIGN_STAFF;
var pre_staff_id = "operatora";
15) init_room
Set which department to enter on the webpages with embedded livehelp. And this parameter has to be used together with init_user and init_password to realize the single sign-on function.
The value should be department ID.
Refer to the following code:
var init_room =1;
16) define_url
Set the location of the must have resource files for the web-based client, such as 123livehelp.swf, lib_123livehelp.swf, client.html
Eg., If you want to visit 123livehelp via http://livehelp.yourhost.com/client.html , then you can set:
var define_url = "http://livehelp.yourhost.com";
17) init_question
Set to show a default question when login the livehelp client. Customer may add content after the question or replace it.
Refer to the following code:
var init_question ="This is my question";
18)init_user
Set to show the default username when login the web-based livehelp client.
It is often used in the integration process. For example you have already logged in a website, and the account username can be passed to init_user so that it won’t be required again.
If no integration is done yet, then only init_user and init_room can enable users single sign-on.
If integration is done already, users single sign-on can be enabled with parameters: init_user,init_password and init_room. Otherwise without init_password, users can single sign-on anonymousiy.
Refer to the following code:
var init_user ="username";
19) init_password
This parameter is invalid unless 123livehelp is already integrated with your website and init_user is defined . You can set init_user and init_password to attach the password automatically.
Refer to the following code:
var init_user ="username";
var init_passwod ="mypasswod";
20) operator_status_live_update
If set this parameter true, then operator status will update at real-time.
Otherwise the online/offline status won't update automatically until next webpage refreshing.
var operator_status_live_update = true;
Livehelp api
Now you can find all department list, operator list, online department list and online operator list via file live_status.js, which is located at: <123livehelp installation directory >/html/
The default path of the web-based client is http://yourhost:8988/live_status.js .
If you have modified the default path of live_status.js file, eg. you have copied the folder html to iis/ html, then you have to set a new path in admin panel->Preferences->system settings->Live Status File Path. Otherwise 123livehelp can’t detect the current sales status, whether he/she is online or offline.
On the webpage with embedded live_status.js, you can directly use the API with JavaScript code, via edit these arrays to obtain the relevant information.
deptList: This array is the list of all department
staffList: This array is the list of all operators
onlineStaff: This array is the list of online operators
onlineDept: This array is the list of online departments
You can display data by traversing these arrays.


